 When you have a 10-year-old who hopes to be a geneticist someday, you can expect your kitchen to serve as an impromptu science lab at any given moment. Ingredients you planned to use for dinner are suddenly cooked up into any number of experiments, and if you planned to have a clean counter at some point, forget it.
Just to be completely clear, other than keeping the toddler out of the shells for a couple of days, I contributed nothing to this project. My daughter did everything on her own. That makes this the perfect experiment for a science fair project, a home school lesson, or just for fun on a boring summer afternoon.
Your kids only need 4 ingredients to complete this stunning experiment, and you won’t have to shop for them at a chemical supply store. You’ll need:
That’s it. This one’s a keeper!! Give your kids the instructions and watch them turn into mad scientists.
*This post may contain affiliate links. Affiliate links are a great way for us to share products we love with you, and they help us keep this blog running.


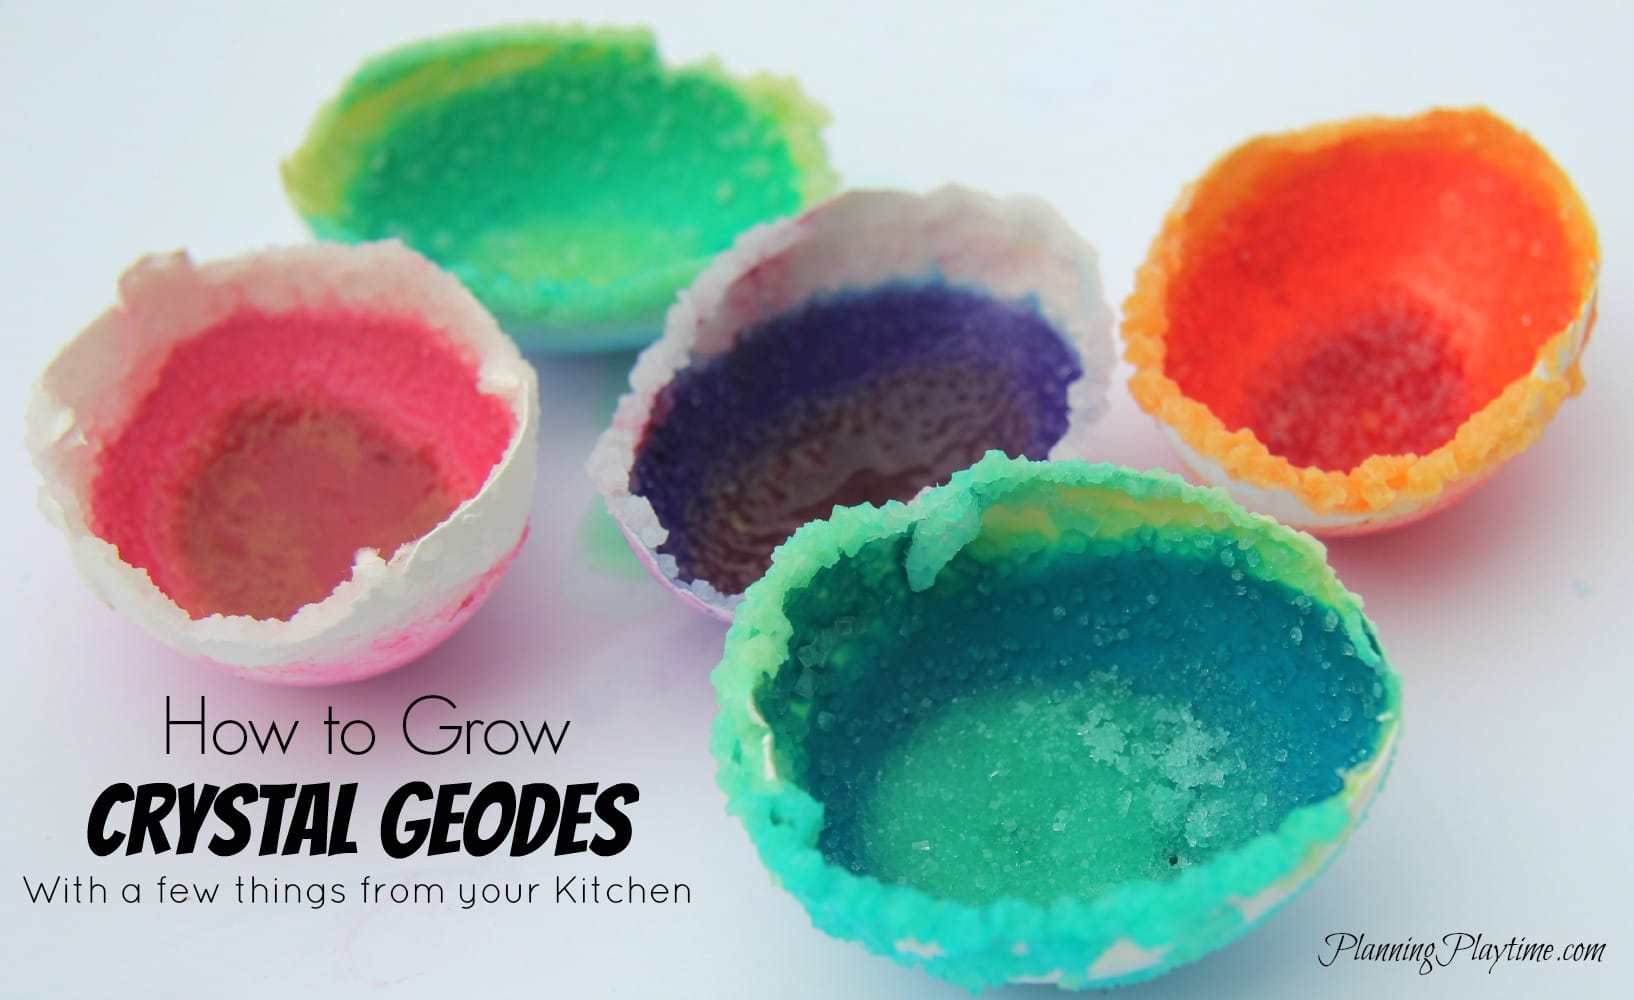
Repeat this process for your additional shells and colors, and then sit back and wait. Crystals can start growing as early as the next day, but tend to peak several days later.
Take pictures each day as the water evaporates and the crystals grow. Watch the changes and enjoy the process. The kids were rushing to the kitchen each morning at our house to check on the crystals.
Once the water has completely evaporated and the geodes are dry, you can display them and show them off at your science fair. You will need to keep them dry, because water will destroy the salt crystals on the geodes.
Thank you for checking out our How to Grow Crystal Geodes project. Give it a try, and let us know how it goes.

43 Responses
This is so very cool! I will be passing this along to my niece, she loves experiments! Thanks.
I’m glad you liked it. This was one of my favorites so far, and it’s super doable.
please change dissolve to evaporate! 🙂 Nice project for kids!!
Oh my goodness! Thank you for catching that for us. 🙂 I’m so happy to hear you liked our project.
This is such a cool idea. Pinned for my son. He loves experiments.
Thanks for pinning, and I’m glad you liked it. This was seriously simple, and I loved that I didn’t have to hunt down any ingredients. I can do eggs, salt, water and food coloring. 🙂
I can’t wait to do this with my wanna be scientist. I think she’s going to really enjoy it.
Thanks for sharing!
Yay! I’m glad she gets to try it. There is some girl science love going around I guess. Makes me happy!
Wow, this looks like so much fun, and so easy. My boys would love this! I’m pinning this now!
Thanks for pinning Tirralan! This was a very cool project, and I’m sure my girls are going to want to try it again.
i have always found geodes so pretty! My son would love this experiment as he is into science.
I couldn’t believe how pretty they were. I wish I was a better photographer. I loved the cool color trails outside the shells of the eggs, and the insides were a total burst of color. Just really amazing all the way around.
These are perfect for my son!!! He will love this! His dad brought him a chemical crystal growing kit thing and was amazed by it. These will make the perfect continuation of the crystal growing. Great post.
That’s awesome. My daughter get’s science kits for Christmas and her birthday’s because she loves experiments. She and her friends burned through the last kit pretty fast, so this was perfect because I didn’t have to go buy anything. I hope your son enjoys it too.
This looks so fun! My daughter loves science and wants to be a scientist and science teacher when she grows up. This would definitely be a cool project to do with her!
Love it Vaneese. My daughter is always working up some science experiment to destroy my kitchen. At least she’s learning something I hope. 🙂
Very cool! My son’s only one, and I can’t wait to do kitchen experiments with him! I have such great memories of doing things like this as a kid.
This is a good one. My 3-year-old thought it was cool, but was a bit young to understand it much. The 6-10 year olds couldn’t get enough. It’s a pretty great project, and I loved that I didn’t have to go buy anything.
This is such a creative idea. I need to try this with some of the kiddos I nanny. Thanks for sharing!!!
You should. It is great fun, and, if that isn’t enough, they are learning things.
Idk what geodes are but they look cool. All of the ingredients are in my kitchen cabinet so we’ll definitely be making these.
That is one of the best things about this experiment for sure. I’m pretty wary of any science experiments that send me to the chemical supply store.
So those look pretty cool! I would like to say I am so doing this with my kids this summer, but I don’t want to set expectations too high.. hehehe 😉
One day at a time. They are actually pretty easy and fast other than the fact they have to sit for a couple of days. Good luck. 🙂
I think my little boy would love making these. It’s so creative and looks like fun. Thank you for sharing your Geode experiment .
No problem. I hope he has a great time. My kids sure loved it.
I don’t have kids lol.. But i myself is pretty much kid inside so i try these crystal geodes and share them with you
Give it a try. I’d love to see the pics when you’ve finished.
This so cool!!! sharing
Thank you! My kid sure loved them.
That is so cool! I love science projects!
Thanks for sharing that @ Pretty Pin Party!
My kids watched it fascinated for a week. It was a great project. 🙂
This was so cool I did it and was just going to make one but ended up making 20 my friends are going to love this thank you
It was one of our favorite science projects, and I’m so glad you enjoyed it!
Do you have to use eggshells or can you use regular sea shells?
For this recipe you would want to use eggshells. You could probably grow them in a seashell if you used a different solution recipe.
Okay thank you! I realised that a seashell didnt really work so right now i just finished making It in an eggshell! I’m still waiting for it to crystalize though :))
Also, one last question, could you use paint instead of good colouring; I’ve ran out 🙁
I’d like to try this in my classroom of 3rd Graders. Do you think egg shells will be too fragile? Any other suggestions for what might work that might be more durable? Thanks!
You need to use actual eggshells unless you want to add additional chemicals. My kids didn’t have a problem with using them, and they are quite young as well. Best of luck!
Amy N.
I teach first grade. I think the children would love this.
Do you have the science behind it? Is there a worksheet?
How many days did it take for crystals to form ?